Friday, March 25, 2011

Papertrey March Bloghop And A Birthday

It is time for another Papertrey Bloghop

This month the challenge was to use to use embroidery floss in a fun and inventive way
I also used the colors from the current Totally Hues challenge #4

This is what I came up with

I started by stamping an image from the Button Boutique set on Vintage Cream Cardstock using Raspberry Fizz Ink. Next I stamped the stem from Floral Fusion 1 then added flowers that I crocheted with embroidery floss.
The first 2 flowers were made using this pattern Nicole shared on her blog a few years ago.
The third one is pattern I came up with on my own.
I added a piece of foam to the backs of flowers then attached them to a piece of acetate so the receiver can take the flower off and use it on a project. Finally I finished off the button cards with a piece of scalloped gingham cardstock.
Today is also my 42nd birthday. Rich has taken the day off and I hope to go antiquing with him and Emilia to celebrate it. I also look forward to seeing what everyone else has come up with now. You can see the whole list of participants on Nicole's blog.I hope the rest of your day is a great one and as always thanks for stopping by.

Sunday, March 20, 2011

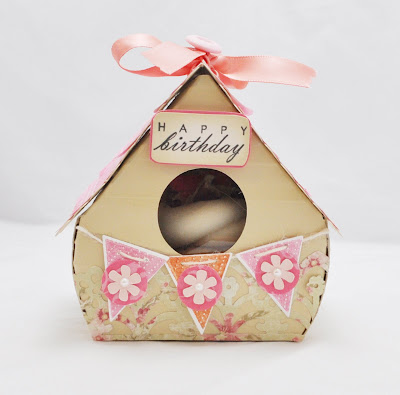
Cupcake Sunday and a Celebration

Happy Sunday! Today is the first day of spring which I am very excited about because it is favorite time of year. It actually feels like spring today too. In honor of it's arrival I have this to share with you today.

It is also my entry for The Shabby Tea Room's first birthday celebration Party Time. This was the inspiration photo

I am also entering it in the ABC DT Happy Bithday Challenge too.
I started with this Template from Nicole Heady's blog. The base of the house was cut out of fine linen cardstock then I scored lines about 1/2" apart using my Score Pal and distressed them with Chammomile ink. For the roof I used the largest size scalloped rectangle Nestabliltie die I had then I covered it with scallops that were punched out of cardstock from this digi paper pack. Next I used my new Martha Stewart Garden Punch I won from Peggy's Sue's Blog give away and some retired Melissa Frances Paper I found on Etsy then I attached it to the front of the box. When I was done with that I created the banner with my PTI banner set which has not seen ink until now. After that I stamped the little sign with a sentiment from Fillable Frames then cut it out and matted it on some Hibiscus Cardstock then I attached it to the front of the box with a dimensional. To finish the house off I added some Melon Berry Satin ribbon that I tied in a bow and a Sweet Blush Button to the top. Now you can't have a party without cupcakes and I discovered these boxes are perfect to hold them. I was planning on making Red Velvet cupcakes last month in honor of Valentine's day but time got away from me and Emilia was into making brownines instead but this month I decided to make Hummingbird Cupcakes which also go perfectly with the box. The recipe comes from the DC Cupcake Girls. I love these show and was thrilled when I saw them on the Martha Stewart Show sharing this recipe. Now I know why the lines are around the block. It is kind of hard to see the cupcake in the box but here it is.

Outside the box

I didn't have a bird cutter so I stamped the humming bird image from the PTI bird watching set then scanned it and imported it into SCAL. After that I cut it out with my Cricut then used the piece the image came out of as a stencil and cut it out of pink fondant using and exacto knife. Some of them kind of look more like a ducks but they are still birds right?

That's it for now. I hope your first week of spring is a great one. As always thanks for stopping by and I will be back soon with more to share.

Wednesday, March 16, 2011

Signs of Spring

Happy Wednesday. I hope the weather is nice where you are. It is suppose to be in the 70's here the next few days. Here is a photo Emilia took. Looks like Spring is definitely on it's way. Super happy about that!
Keeping with the spring theme,Today I want to share this with you.

I started with the SVG Easter Basket Card file from The Cutting Cafe. I cut the base of the basket out of Vintage Cream Cardstock then I embossed it with the Woodgrain Impression Plate and ran my Chai ink cube over it to make it look like real wood. I created the basket weave pattern on top of gingham digi cardstock that I got from this paper pack. The eggs were stamped with a different PTI background patterns then I embossed them with sticky embossing powder and covered them in glitter. The grass was cut from this SVG file. A piece of crochet lace trim was added to the top of the basket and a couple of butterflies were attached to the handle. I finished the front of the basket off by adding a tiny tag that was stamped with the Easter sentiment from the original PTI Mixed Messages set to a bow made out of vintage seam binding and stitched it to the front of the basket. The inside looks like this

That's it for now. I will be back soon with more to share. In the meantime I hope the rest of your week is a great one and as always thanks for stopping by.

Friday, March 11, 2011

March SFYTT, Totally Hues 3, Make It Monday 5

Happy Friday! I hope your week has been a good one. Thanks for all the sweet comments you left about my Lady Bug Card and my Shabby Tea room win. They really meant a lot to me. I also found out I was made member of the month for my Etsygreetings team on Monday too. They were both a great way to start my week. We are also having beautiful weather here with more to come all next week. March has definitely come in like a lamb so I know it it probably going to go out like a Lion now but I am still going to enjoy it while it lasts. I hope the weather is good where you are too.
Today I am sharing a card I made for 3 challenges.
The first one is this months SFYTT

The second one is Totally Hues Challenge #3

The 3rd challenge is this weeks Make It Monday Monday #5 Distressing Edges.
This is what I came up with

I am continuing with my challenge to myself to use my Year Of Flowers sets. This month is the Daffodil. I started by stamping the large daffodil image on white cardstock at an angle then colored it with Copics. After that I did the Level Up Technique from the October/November 2010 Technique Junkies Newsletter on the middle of the flower and finished it off with some tiny pearls. Next I stamped the Aqua mist pieces with an image from the Polka Dot Basics set using Versamark ink then embossed them with white embossing powder.The orange piece was embossed with tiny dots. The patterned yellow paper is from October Afternoon. I stamped the word Mother from the Original Mixed Messages set and added some machine stitching to finish it off. I also distressed all the edges of the cardstock. Here is a close up photo so you can see it and the leveled up part better.

That's it for now. I hope you all have a great weekend and I will be back soon with more to share

Sunday, March 6, 2011

Lady Luck

ETA Monday 3/7: This card was the winner of the challenge on the Shabby Tea Room blog and I get to be a guest designer the week of May 9th now!

Happy Sunday! I hope your weekend has been a good one. I have been bitten by the Twilight Series. Emilia has been obsessed with it for the last few weeks and begged me to watch the movies with her. It was so bad it was good. I have seen all 3 movies and am now reading the last book since that movie won't be out until November. I usually never like things like this but it has sucked me in.
Today I want to share a card with you that I created for 3 challenges. The first one is for the current Peeps challenge hosted by Kimberly which is to make a card that is a symbol of good luck.
The second challenge is for Make It Monday #4 which was to make something using Fun Foam. When I first tried making something for this challenge with it I was not liking the look of the foam. I thought it looked cheap and gaudy and was not going to play along but after giving it some thought I was able to make it work on this card and love how it looks here.
The 3rd challenge is this inspiration photo from The Shabby Tea Room.
This is what I came up with

I have wanted to make a lady buy card like this for awhile now and thought this was the perfect chance. I started by cutting out a 5" black circle card using my Cricut for my base. After that I cut another circle from red checkerboard paper that Rich created for me. Next I die cut the buttons from chipboard then stamped them using black ink an image from the Delightful Doilies set. When I was done doing that I covered them with glossy accents and set them aside to dry overnight. Next I cut flowers from white fun foam using a Cuttlebug flower die then attached the buttons to them and placed them on the wings that I cut in half and attached with a brad to the base. For the head I cut black and white circles then embossed the white one with tiny dots. The antenna were made with more foam flowers and buttons that I die cut from more red checkerboard paper covered it with glossy accents and stitched with black floss. I attached them with black wire. To finish it off I added a lace border on the edge of the wings. When you open the wings it looks like this

I added a white scalloped circle to write a message on.
I am very happy with how this came out, I hope you like it too and since I am already talking about luck in this post last week I got lucky and found a great deal on a Vagabond and it arrived yesterday 3 weeks early. It is was going to be my birthday present from my family but my birthday is not until the 25th. I am already putting it to good use though. So far I am loving it and I know my shoulders and neck will too. As much as I have love my Cuttlebug it was taking a toll on my body with all that cranking. I will still continue to use my Circut too! That's it for now. I will be back with more to share soon. Until then I hope you have a great week and as always thanks for stopping by!