Friday, December 30, 2011

A Year In Review

Happy Friday. I hope your week has been a good one. Thankfully my Silhouette is working now. I called on Tuesday and the guy I spoke to had me move the blade carriage back and forth a few times and that got it working. I have not had time to really play with it yet but I did try to cut a few things and so far it seems to cut better than the Cricut. It also works with SCAL 3 which I am very happy about.
I have also been busy most of the week with another custom order on Etsy and I decided it was time to reorganize my stamping desk. I could not stand to look at it any longer. I can't believe I let it get that bad. I have ordered a bunch of CD boxes and things that hopefully will help to keep it organized from now on and I am going to try really hard to keep it that way next year.
Since there are only a few days left of this year I wanted to share my favorite projects of 2011 by participating in Karin's Year In Review Blog Hop I discovered it from Leigh Ann's blog

These are some my favorite projects from each month. Click on the month to find out more about them.

January

February

March

April

May

June

July

August

September

October

November

December

Overall it has been a pretty good year. Instead of making resolutions I am just going to take 2012 one day at a time and see what it brings. I hope you enjoy the last few days of the year and 2012 will bring much happiness, good health and creativity to you. I will be back in the New Year with more to share and as always thanks for stopping by.

Monday, December 26, 2011

December Papertrey Bloghop

Happy Monday! I hope you all had a good Christmas if you celebrated it yesterday. We had a pretty good one. Emilia got almost everything she asked for so she is very happy. Rich and I were only suppose to get each other something small but he didn't stick to that plan and surprised me with a Silhouette Cameo. Unfortunately it is not working though. When I try to cut something with it the blade housing does not move and just bounces up and down making a lot of noise. The manual has been of no help and I have not found anything online either. If any of you with a Silhouette have any idea what might be wrong please let me know. All I can do at this point is wait until tomorrow and call their Customer Service. It was really sweet of Rich to buy me one but I feel really guilty that I didn't get him something bigger now. He keeps telling me that was not why he got it for me and to enjoy it so that is what I plan on doing once I get it to work. Hopefully the problem is minor and can be solved easily. At least I still have my Cricut to use in the meantime.
Today is also the December Papertrey Bloghop. The challenge this month is "Holiday Leftovers" which means we were to use some type of leftover materials to create a project. This challenge is always a hard one for me but this is what I came up with.

Rich bought this wrapping paper to wrap our gifts with. I was able to find a section that didn't have any Christmas images and make it work for Valentines Day.
I also used this months Sketch For You To Try again.

I started by stamping the bird cage from The Love Birds Set on Vintage Cream Cardstock. Next I stamped the red hearts and the birds in gold. I distressed the edges with Chi ink and my scissors then I machine stitched around it. The circular doily piece was cut with this SVG file and Gold Shimmer Cardstock. The sentiment is also from The Love Birds set and matted on Pure Poppy Cardstock. I finished the card off with 3 heart brads and more machine stitching.
I look forward to seeing what everyone else has come up with now. You can see the full list of participants on Nicole's Blog. I hope the rest of your last week of 2011 is a great one and as always thanks for stopping by.

Friday, December 23, 2011

Snowman Love

Happy Friday. I hope your week was a good one. We had a big snowstorm here yesterday that resulted in about a foot of snow and the delivery of my new release Papertrey order being delayed because of the weather. Thankfully it is out for delivery today though. I could have done without all this show and would much rather it be summer right now but at least Emilia is loving it and she will definitely get her white Christmas. I just hope it does not stick around to long.
Since I am done with all my holiday projects for this year now that means it is time to start working on winter and Valentine things so today I wanted to share this.

Even though I don't love snow, I do love this snowman. I think this would be great way to give a little love this Valentines Day. I started by cutting the pieces of the snowman using this snowman giftcard holder SVG file from Scrapchick and PP from the The Modern Merry Paper Pack . Next I created the Heart banner by stringing the hearts on button twine then I added the PTI block alphabet letters and snowflakes from the Winter Penguin Die Collection with rhinestones added to the middles. When I was done with that I attached the banner to the snowman by threading twine through his mittens and securing them on the back. Finally I finished it off with a white button threaded with red and white bakers twine then tied in a bow and 3 tiny faux black buttons,
Inside there is a perfect place for a giftcard

I also wanted to share the Gingerbread cookies Emilia and I made for her ice skating teacher yesterday. This is how I packaged them up for her. I got the inspiration for the tag here.

We are continuing to celebrate Hanukkah which started on Tuesday night and we will also be opening presents on Christmas day too. Emilia loves Christmas and everything about it so we do it for her. I will be back Monday to share my blog hop project with you until then Happy Holidays and if you are celebrating Christmas on Sunday I hope it is a great one!

Saturday, December 17, 2011

Year Of Flowers Poinsettia

Happy Saturday. I hope your week was a good one. It is suppose to be in the 50's here this weekend. Hopefully the warmer weather will help to melt the rest of the snow. Today I want to a card I made with Year Of Flowers Pointsetta. This completes the challenge I set for myself at the beginning of the year to use all the flowers in this series. I got the inspiration for this card here. This is my version.

I started by stamping the Poinsettia 3 times then I colored it with Copics. After that I cut them out and assembled them with foam tape to give it dimension. Next I cut the quaterfoil piece from Scarlett Jewel Cardstock using this SVG file When I was done with that I attached it to a piece of script patterned paper. Finally I stamped the Believe sentiment from the Believe set on a piece of Rustic White cardstock, drew 2 gold lines with a paint pen then added machine stitching to finish it off.
I am really proud of myself for completing this challenge and have created a Pinterest Board for all my Year Of Flower cards here Hopefully it will help inspire you to use your sets too. That's all for now I am off to finish the Etsy order I have been working on all week. I hope rest of your weekend is a great one and as always thanks for stopping by!

Monday, December 12, 2011

Candy Cane Lane

Happy Monday. I hope you had a good weekend. We finally got to 50 yesterday. Still to cold for me but at least it is not snowing.
Amy Jaz Designs had another new release on Friday called Candy Cane Lane
This is the paper pack

These are the elements

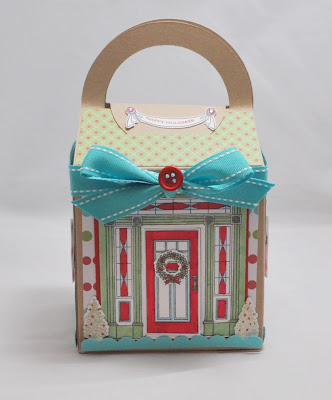
This is what I made with it.


I have wanted to make one of these boxes for awhile now and when I saw this paper I knew this was the perfect chance. I intended to enter this in the ColorQ challenge last week but didn't get it finished in time. I still used the colors for inspiration though.
I started with the Perfect Presentation Favor II box SVG template and Kraft Cardstock then I added the roof and sides using papers from the kit. The front was made with the new Door To Door set from Papertrey Ink. When I saw that set I knew I had to have it. This is the first time I have used it and I love it! You will definitely be seeing more houses made with it. I stamped the main image then colored it with Copics. Next I cut the door with the matching die then attached it to Pure Poppy Cardstock. After that I added the trees and wreath. On the sides I added windows from the Homemade set. On the top of the box where the flap opens I added the banner and sentiment from Door To Door and tiny red Rhinestones. To finish it off I added Hawaiian Shores scalloped trim to the bottom, Hawaiian Shores saddle stitched ribbon and a Pure Poppy Button. Inside the door is a a place to write to and from. It is from Fillable Frames #9. These boxes are the perfect place to add some homemade Peppermint chocolate cookies. Emilia made them. You can get the recipe here.
That's all for now. I have a big Etsy order that is going to keep me busy most of the week but I will be back soon with a few more holiday projects to share. Until then I hope the rest of your week is a great one and as always thanks for stopping by.

Thursday, December 8, 2011

Modern Merry

Happy Thursday. I hope your week has been a good one. It is still very cold here. The snow we got last week is slowly melting though.
Amy Jaz Designs is the guest designer at The Lilypad for the month of December. This is her newest kit The Modern Merry Paper Pack she has for sale there.

Here is a card I made with the kit.

I didn't have time to use my November Year Of Flowers set last month so I used it on this card.
I also used this weeks Sweet Sunday Sketch for the layout but I flipped it.

I started by stamping the mum twice then colored it with the Pure Poppy Copic Trio. I cut out the center of the flower then attached it to the middle of the first one to give it some dimension then I added it to the circle with foam tape. After that I colored the leaves and added them with foam tape too. When I was done with that I stamped the sentiment from Fillable Frames #2. Next I added some patterned paper from the kit and embossed the New Leaf background with the Linen impression plate. Finally I finished it off with Spring Rain Satin ribbon, Dew Drops, Machine Stitching and a Pure Poppy Button.
Amy has also designed a matching elements kit

And a matching Paper Flags Kit.

As you have seen by looking at my card this kit is not just for Christmas. It would also be great to use if you are documenting your December.
I will be back soon with another project using these kits. In the meantime. I hope the rest of your week is a great one and as always thanks for stopping by.

Saturday, December 3, 2011

December Sketch For You To Try

Happy December! It is cold and snowy here. How is the weather where you are? I hope it is sunny and warm. Today is also the first Saturday of the month which means it is time for the final Sketch For You To Try this year.

There is not a sponsor this month but Jen asked use to use one of this years sponsor's stamps. Also be sure you check out Jen's blog about the big giveaway that will be given to one lucky person who used all the sketch's this year. It is a huge prize package that includes Gift Certificates, Stamps and a year's subscription to the SCS Fan Club.
Here is the Sketch

This is what I came up with

I decided to use Ellie Walks Her Dog from Your Next Stamp. They were our sponsors back in May. I did not get a chance to use their stamps then but I won this stamp in the Back To School Wee Memories Challenge back in September that they also sponsored so I thought this would be the perfect opportunity to use it. I love this image because it reminds me of myself and my fur baby Lily going for a walk on a beautiful spring day. I started my card by turning the sketch. Next I stamped the main image on Neenah White Cardstock and colored it with Copics. After that I drew in the sidewalk and the grass. When I was done with that I matted the finished piece on Berry Sorbet cardstock and machine stitched it. The circle piece was cut from PP in that came from the Stella and Gertie Paper pack. The Background PP is from the Cosmo Cricket Uptown collection. The sentiment is from Fillable Frames #5. I finished the card off with 3 Hawaiian Shores buttons and more machine stitching.
There is no guest designer this month either but be sure to check out what Jen and the other sisters have done with this sketch too.
Amber Hight
Amy Sheffer
Carol Burrage
Jodi Collins
Megan Lock
Kerry Johnson
Susan Liles
Jen Tapler
Becky Carafa
Iwona Palamountain (Chupa)
I hope you will play along with as well and the rest of your weekend is a great one. I will be back soon with more to share and as always thanks for stopping by.

Wednesday, November 30, 2011

Joy Banner

Happy Wednesday! I hope your week has been a good one so far. Today we enjoyed beautiful 60 degree weather but that is all suppose to change tomorrow when snow and cold are due to arrive. Hopefully it won't stick around long.
Today I want to share this with you.

I have had this idea in my head for awhile. I started working on it a few weeks ago but had to stop to fill some Etsy orders. I was finally able to finish it last night.
I started by cutting out the stockings from the My Timeless Template Stocking Template using digital patterened paper from Amy Jaz Designs A Very Vintage Christmas Kit Next I created medallions using more paper from the kit, a limitless layers die and this tutorial. The letters were cut with SCAL using the Bantang font then covered with red glitter.
The snowflakes were cut using an image in SCAL then covered in Clear German Glass Gitter. Silver bells were added to the ones on the top. A pure poppy button was added to the one in the middle of the O. Holly was cut from more PP using the Holly Jolly Dies and rhinestones were added for the berries. Red Garland, Paper lace and machine stiching finish it off. The stockings are attached to New Leaf Twill ribbon and backed with Hunter Green and Scarlet Jewel cardstock. I also created loops on both sides to make it easy to hang.
It was a lot of work but am really happy with how it came out. I hope you like it too. I will be back on Saturday with a new Sketch For You To Try. Until then I hope the rest of your week is a good one and as always thanks for stopping by.

Monday, November 28, 2011

Hanukkah Dreidel Gift Bag Box

Happy Monday, I hope you had a good weekend and your week has started out well. We went to see Breaking Dawn today and thankfully we made it there and back without any problems this time. Unfortunately I didn't like it. I think the book is much better. Emilia really liked the movie though.
Today I want to share a project I made for this years Papercrafts Holiday Cards Magazine back in the spring but it never got accepted.

I started by cutting Favor It Box Die 1 out of Silver Shimmer Cardstock. Next I cut Mat Stack one out of Stampers Select White Cardstock then stamped an image from the coordinating stamp set using Enchanted Evening Ink. After I was done with that I stamped the dreidel image from the Mazel Tov set and colored it with Copics, cut it out then added it to the circle. Finally I finished the box off with 2 Ocean Tides Buttons. Inside is the perfect place to add a bag filled with Hanukkah Gelt and a Dreidel

I think these would make great Hanukkah Gifts. That's it for now. I hope the rest of your week is a good one and I will be back soon with more to share.

Friday, November 25, 2011

November Papertrey Bloghop

Happy Friday. I hope your Thanksgiving was a good one if you celebrated it yesterday. Today is the 25th of the month which means it is time for another Papertrey blog hop.

This month we were to use this photo for inspiration

This is what I came up with.

I started by using this months Sketch For You to Try again as my layout.

I thought this sketch was perfect for the image from Stylish Sentiments and I was right. Thanks again June for sending it to me! Once I cut it down it was a perfect fit. Next I matted it on wood veneer then stitched around it with red thread. When I was done with that I created the bottom piece using images from Love Lives Here Holiday then added tiny pearls to the middle of the heart ornaments. The green background paper is from Echo Parks All I want for Christmas Paper Pack. The red Gingham cardstock is from the My Time Made Easy GaGa for Gingham Paper Pack and I reduced it by 50%. Finally I finished the card off with more Wood Veneer, 2 snowflakes from the new Winter Penguin Die Collection and red rhinestones.
I look forward to seeing what everyone else has come up with now. You can see a full list of participants on Nicole's Blog. I hope the rest of your day is a great one and as always thanks for stopping by.

Monday, November 21, 2011

Sweet 16 That Turned Out To Be Not So Sweet

Happy Monday. I hope your weekend was a good one. Today is my niece Alexandras 16th birthday. We were going to go see the new Twilight movie Breaking Dawn to celebrate and I was going to write about it after we got back but unfortunately we never made it to the movie because we got into a car accident on the way there. Thankfully none of us were seriously hurt but the driver that hit us was not looking good. They think she may have had a seizure. I hope she will be okay. My sister was driving and Emilia and I were in the back seat. We were stopped at a red light and all of sudden out of no where it felt like we were on the bummer cars ride at the amusement part but 10 times harder. The car was damaged pretty badly but can be fixed. The most important thing is we are okay. What an awful thing to happen on your 16th birthday though. Seeing as this is Thanksgiving week I am even more thankful we are all alive right now.
Earlier this morning I started this post about the card I made for her birthday and still want to share it with you. Most of you know from my past posts she loves Hello Kitty. I made her this card last year and she loved it so I had to make her a Hello Kitty card again. This time I used this SVG file. This is what I came up with


She loved it but after what happened I don't know when she is going to get her license now. Hopefully in time she will want to drive. In the meantime she can enjoy the card and spending the money I put inside the pocket that was made with the library die and stamped with a sentiment from Fillable Frames. Hopefully the rest of the day will turn out better then it started for her.
I hope you all have a great Thanksgiving if you are celebrating it and I hope to be back soon with more to share.

Monday, November 14, 2011

Etsygreetings Holiday Blog Hop

Happy Monday! Today I am participating in the Etsygreeting's Team Holiday Blog Hop. The theme for this hop is to share our favorite handmade holiday traditions. As most of you know I am Jewish and celebrate Hanukkah. This year Hanukkah starts On December 20th and lasts for 7 days. Our favorite thing to do for Hanukkah is to light the menorah but since the theme of this bloghop is a favorite HANDMADE tradition I thought I would show you how to make your own Beeswax candles to use in the Menorah.
First you start with sheets of Beeswax. I got mine here
Next you cut it into strips.

When you are done with that you add a piece of wick to the middle of a strip and press it into the wax. Then start rolling and shaping it.

This is what you will get when you are done

Making these kinds of candles is not hard and would be a fun project to do with your kids too!

It is also traditional to eat foods fried in oil for Hanukkah which helps to remind us of the miracle of oil that burned for eight days during this time so I am also sharing my recipe for Latkes (Crisp Fried Potato Pancakes) with you.

Ingredients:
2 1/2 lbs of potatoes
1 large onion
3 large eggs
1 teaspoon of salt
1/4 cup of matzo meal or 2 to 3 Tablespoons of flour
Vegetable Oil for Frying

Instructions:
1.Start by peeling and grating the potatoes and onion. I use a food processor for this. Then squeeze out as much water as possible.
3. Add the eggs, Matzo meal or flour and the salt. Mix well.
5. Let rest for 5 minutes
In the meantime heat about 1/8 inch of oil in a heavy skillet.
When the oil is hot start adding the potato mixture by the spoonfuls and push them down with the back of the spoon.
Fry them on each size until golden brown and crisp.
You can eat them plain or with sour cream or applesauce.


I hope you have enjoyed learning about some handmade things you can do for Hanukkah. Be sure to click on the right arrow to take you to the next blog in the hop. If you missed the blog before me click on the left arrow. You can also see a list of all the participants by clicking on the circle. As always thanks for stopping by and I hope your week is a great one!